Tag Archives: vegan tips

Some Thoughts on Cooking Oils

IMG_3222Fats are important! They absorb flavor, can add flavor, distribute heat, provide a mouth feel, and generally add satisfying notes to everything we cook.

There are high-heat oils and low-heat oils (smoking points), flavorful oils and neutral. Simply put, the oils you use when cooking, baking, and finishing can make a world of difference in your dish.

The challenges are even greater for vegan cooks, we don’t have meat to add fat or moisture and animal fats are very specific in texture, density, and heat-resistance. Getting a vegan dish “just right” requires some fiddling with fats.

Here are some of the Cooking Oils and Fats I have in my Pantry and how I use them:

Extra Virgin Olive Oil: Probably use this the most and you really must buy the “Extra Virgin” standard. EVOO is a medium-high heat oil. Good for a quick sauté, but anything more and I’ll fortify it with a little Grape Seed Oil (see below). Of course use EVOO in all salad dressings and when finishing pasta salads and when cooking Italian, Greek, or in any Mediterranean style. I like mildly fruity, so Whole Food’s Spanish Olive Oil is my go to. And please don’t cook pancakes with it.

Really Expensive EVOO: I don’t buy this. I will usually have a small bottle on hand that someone gave to me as a gift or I’ll pick one up for an important dish or dinner party. Essentially, if you buy a decent 10 buck EVOO, that’ll do for most finishing needs. These delicate Olive Oils have low-smoking points and will burn easily, so best not used for cooking.

Flavored EVOO: Hard Pass. Flavor your own damn oil!

Grape Seed Oil: My oil for high-heat pan cooking and extended sautés or caramelizing. I also use Grade Seed Oil often to fortify EVOO for things like Tomato Sauces where you’re sautéing first, but want the fruitiness of EVOO carrying the flavor or spice.

Coconut Oils: Remember this…Virgin Coconut Oil tastes like coconut…Refined Coconut Oil does not. Refined coconut oil is a nice high-heat oil, you can use it to fry, but there are cheaper alternatives for that, but if you cook too high with unrefined coconut oil, you’ll start to burn the residual fruit left in and burnt coconut is nasty. In it’s natural semi-solid form it can be used in baking and pastries almost like a butter alternative. I like to use Virgin Coconut oil in cookies and Thai Food dishes.

Toasted Sesame Seed Oil: A must for Asian dishes, but this is a finishing oil, don’t cook with it! The “Toasted” part is very important…adds a nutty nose and flavor. Be careful not to buy just Sesame Seed Oil without the “Toasted.”

Canola Oil: I have a big jug of this under the counter. I fry with this, bake with it, and use it when i need a nice neutral oil in volume. I use canola when cooking my Mexican, Asian and Indian dishes. I feel like it can make a dish oily though and make your lips feel greasy (?!?) so don’t go crazy.

Cooking Sprays: I use these mostly for baking – I have a Canola (neutral) and an Olive Oil Spray (very little flavor).

There are a lot more out there! Avocado Oil is big and trendy and fortunately for everyone everywhere Truffle Oil seems to be crawling back under the rock from whence it came.

I hope this offers a good, simple overview!

Enjoy!


Smokey Maple Shiitake Bacon

Prep time: 15 minutes/Cook time: 40 minutes

Marinating time: 1-2 days

Shiitakes are an excellent blank slate for flavors and just the right structure to crisp and crumble when baked, provided you add a measured amount of fat and salt.

There are quite a few recipes out there for this excellent plant-based alternative. Most of the others have a little less wait time and use fresh shiitakes. My recipe adds a considerable amount of marinating time and uses dried shiitakes. I use dry for three reasons, they tend to pick up and hold the flavors better, they’re pre-sliced nice and thin, and they’re sooooo much cheaper!!! Head to your local Asian Market and you can pick up an 8oz pack of dried, sliced shiitakes for a couple bucks.

2 oz of dried sliced shiitake mushrooms – pick through for the larger slices

1/4 cup Brown Sugar

1/4 cup Maple Syrup

1/4 cup Grape Seed oil

2 Tbs Kosher Salt

1 Tbs Braggs Aminos or Tamari Soy Sauce

1 Tbs Balsamic Vinegar

1/2 tsp Liquid Smoke

Rinse your dried shiitakes a couple times with cold water. In a bowl is best. During your second rinse, fill the bowl with water and lift the mushrooms out with your hands (this allows any nasty stuff to sink to the bottom) and place in a clean bowl. Cover with approximately 3 cups of luke-warm (not boiling) water and rehydrate for 45 minutes.

When rehydrated, again lift the shiitakes out of the water and transfer to a nest of paper towels. Using a cheesecloth-lined strainer slowly pour the mushroom liquid into a mason jar or other container for storing. You’re not going to use this liquid in the recipe, but now you have about 2 cups of a light mushroom stock that you can use to cook rice, etc.

Gently squeeze most of the water out of the mushrooms in your nest of paper towels and lay out each shiitake flat in an 8 x 11 glass baking dish. Set aside.

For the marinade, wisk all ingredients in a small bowl and pour evenly over the top of the mushrooms.

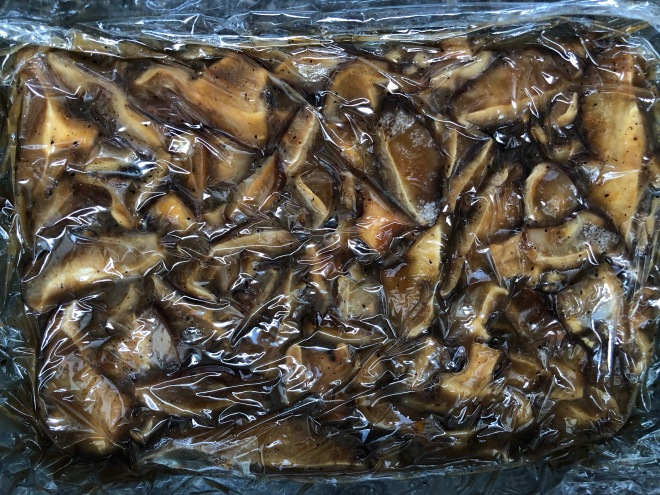
Using plastic wrap, carefully cover and gently press the plastic wrap directly on to the mushrooms and marinade and create a loose seal around the perimeter.

IMG_3175

Put in the fridge and let it hang out for a day or two.

When you’re ready for bacon, preheat the oven to 350 degrees.

Line a baking sheet with parchment and sprinkle lightly and evenly with kosher salt. Remove the plastic wrap covering and carefully lay each mushroom flat on the salt-lined parchment.

Bake on the middle rack for a total of 30 minutes, you’re going to turn the mushrooms several times and rotate the baking sheet in the oven to ensure even browning, so stay alert!!

Keep a close eye, ovens vary. You may want to crack the oven door a couple times to release the moisture, to stare in wonder, and to allow your sinuses to be filled with plant-based love.

Depending on how crisp you want you bacon, you may want to turn the oven off after the 30 minutes are up and let the bacon hang out in the warm oven for another 10 minutes.

Chop or crumble it, throw it in a tofu scramble, or stack up a vBLT!!!

Enjoy!

Vegetable Roasting Tips

Prep time: 15 minutes /Cook time: Varies/Total Time: Varies

You’ll start noticing that my recipes usually have a few more steps and a little more combining ingredients toward the end of the process. For instance, I’ll caramelize mushrooms for risotto and fold them in at the end instead of adding the mushrooms to cook with the rice. While this may cause a few more dirty dishes, I’m a big believer in texture and cooking veggies with different methods really allows you to explore mouth feel, crunch, etc.

Roasting is a great way to cook veggies, it can bring out a lot of different flavor tones and gives you opportunities to build complementary flavors and textures within the same dish or with each bite.

What you’ll need:

Vegetables (about 2-3 lbs for an uncrowded baking sheet)

A preheated 400 degree oven

Baking sheet

Parchment Paper

Your nose and your eyes

When roasting veggies of any kind make sure to cut them in relatively consistent sizes and if you’re roasting different types of veg, make sure they have about the same density and water content…roasting carrots and potatoes together is gonna be fine, roasting zucchini with turnips is going to be a mixed-up watery mess.

Note: if you’re not comfortable using parchment at higher temps, please use a silicone mat…foil tends to stick and will rip off that nice crispy caramelization.

The spice palate is going to depend on what you’re trying to achieve. For example, if I’m roasting potatoes for a snack or a side, I’m going toss them with olive oil, S&P, a little Italian seasoning, red pepper flakes, and some paprika, before I lay them out on the parchment…if I’m adding roasted cauliflower to a curry recipe, I’ll spice that a little differently and use a neutral flavored oil.

In the pictures I’ve posted here, I was clearing out my fridge. I had some big loose beets, some aging carrots, and a random head of cauliflower. I broke apart the cauliflower and peeled and cut the beets and carrots, tossed them with EVOO, S&P, garlic powder, oregano, and dill and stuck them in the oven for about an hour and 15 minutes.

Your senses will tell you when they’re done! You’ll smell the warmth and goodness of roasted vegetables and you’ll see the edges getting crispy and browned without even opening the oven. I don’t recommend a lot of flipping and tossing because part of the joy from roasting is you get some different textures and flavors that come about naturally, but rotate the baking sheet in the oven about 3 times throughout the process.

Happy Roasting!

Cashew Cheese Sauce

Cashew Cheese Sauce

1 1/2 cups raw cashews – Soaked at room temp for at least 6 hrs. Drain.
1/4 cup olive oil (grape seed mix)
1 Tablespoon salt
2/3 cup nutritional yeast
1 cup plain unsweetened almond milk
*1 1/4 cup vegan sour cream (*or plain non-dairy yogurt, and i even like to use about a cup of roasted yam or sweet potato)
1 Tablespoon Turmeric
1 teaspoon garlic powder
1 teaspoon onion powder
q teaspoon of smoked paprika
Fresh ground pepper
1 teaspoon Dijon mustard
Blend all until well mixed and almost fluffy.
  • Too thin? Add some panko crumbs slowly to thicken.
  • Toss with pasta whatevs. Eat with raw veggies, add hot sauce & chilies for queso, etc – Have fun with it!

There you go. My first blog post.

btw – in the pict, that’s homemade shiitake bacon on top…. I’ll give you that recipe a little later.

More soon!