Vegan Recipes

Smokey Maple Shiitake Bacon

Prep time: 15 minutes/Cook time: 40 minutes

Marinating time: 1-2 days

Shiitakes are an excellent blank slate for flavors and just the right structure to crisp and crumble when baked, provided you add a measured amount of fat and salt.

There are quite a few recipes out there for this excellent plant-based alternative. Most of the others have a little less wait time and use fresh shiitakes. My recipe adds a considerable amount of marinating time and uses dried shiitakes. I use dry for three reasons, they tend to pick up and hold the flavors better, they’re pre-sliced nice and thin, and they’re sooooo much cheaper!!! Head to your local Asian Market and you can pick up an 8oz pack of dried, sliced shiitakes for a couple bucks.

2 oz of dried sliced shiitake mushrooms – pick through for the larger slices

1/4 cup Brown Sugar

1/4 cup Maple Syrup

1/4 cup Grape Seed oil

2 Tbs Kosher Salt

1 Tbs Braggs Aminos or Tamari Soy Sauce

1 Tbs Balsamic Vinegar

1/2 tsp Liquid Smoke

Rinse your dried shiitakes a couple times with cold water. In a bowl is best. During your second rinse, fill the bowl with water and lift the mushrooms out with your hands (this allows any nasty stuff to sink to the bottom) and place in a clean bowl. Cover with approximately 3 cups of luke-warm (not boiling) water and rehydrate for 45 minutes.

When rehydrated, again lift the shiitakes out of the water and transfer to a nest of paper towels. Using a cheesecloth-lined strainer slowly pour the mushroom liquid into a mason jar or other container for storing. You’re not going to use this liquid in the recipe, but now you have about 2 cups of a light mushroom stock that you can use to cook rice, etc.

Gently squeeze most of the water out of the mushrooms in your nest of paper towels and lay out each shiitake flat in an 8 x 11 glass baking dish. Set aside.

For the marinade, wisk all ingredients in a small bowl and pour evenly over the top of the mushrooms.

Using plastic wrap, carefully cover and gently press the plastic wrap directly on to the mushrooms and marinade and create a loose seal around the perimeter.

IMG_3175

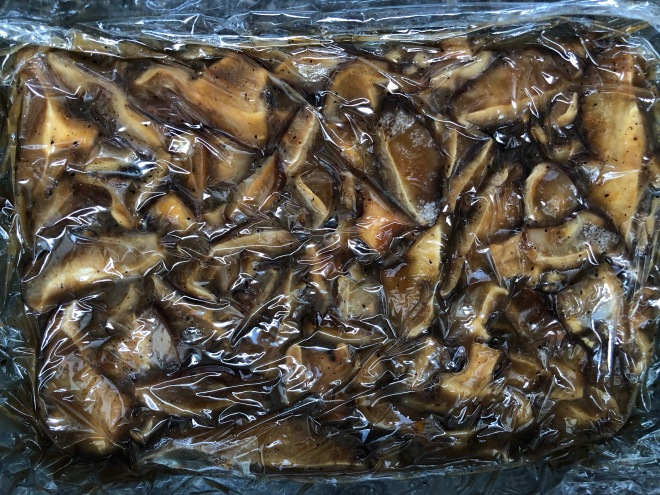
Put in the fridge and let it hang out for a day or two.

When you’re ready for bacon, preheat the oven to 350 degrees.

Line a baking sheet with parchment and sprinkle lightly and evenly with kosher salt. Remove the plastic wrap covering and carefully lay each mushroom flat on the salt-lined parchment.

Bake on the middle rack for a total of 30 minutes, you’re going to turn the mushrooms several times and rotate the baking sheet in the oven to ensure even browning, so stay alert!!

Keep a close eye, ovens vary. You may want to crack the oven door a couple times to release the moisture, to stare in wonder, and to allow your sinuses to be filled with plant-based love.

Depending on how crisp you want you bacon, you may want to turn the oven off after the 30 minutes are up and let the bacon hang out in the warm oven for another 10 minutes.

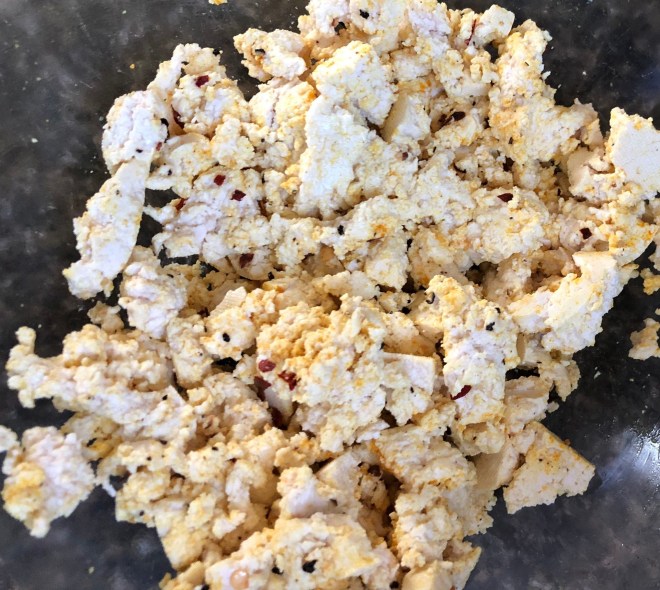
Chop or crumble it, throw it in a tofu scramble, or stack up a vBLT!!!

Enjoy!

Quick Vegan Chocolate Cake

I don’t know who the heck Eva Howes is, but she makes a damn good chocolate cake!

My friend Lisa texted me this recipe:

Eva Howes' Chocolate Cake

Turns out this is her family’s go-to cake recipe and it’s simple and delicious! Passed down, clipped from a newspaper, and glued on and index card…these are my favorite kind of recipes…well worn and well loved. Dairy free, egg free, and you can literally make this anytime from what you’ve already got in your pantry.

As you can see, I made frosted cake squares, but this cake is certainly hearty enough for stacking and frosting. I substituted the 2 cups of water for 2 cup of cold coffee and I used dairy free store-bought frosting (most brands are) but jazzed it up with some shredded coconut tossed in cacao powder!

Enjoy!

Tofu Scramble

Prep time: 5 minutes /Cook time: 8 minutes/Total Time: 15 minutes


Half a block of Extra Firm Tofu, drained under weight

4 Tbs grape seed or other high-heat oil

1 tsp crushed red pepper flakes

½ tsp garlic powder

½ tsp turmeric

½ tsp black pepper

½ tsp kosher salt

Pinch of sugar

Splash of rice wine vinegar


½ Red or Green Bell Pepper

½ cup Red or Yellow Onion


Weight and drain your tofu (I use an inexpensive tofu press) and crumble into, for lack of a better term, “scrambled egg size” pieces. In a bowl, toss the crumbled tofu, oil, spices, sugar and vinegar together and let it marinate for about 10-15 minutes while you chop your bell pepper and onion.

Tofu Scramble 2

Crumbled and seasoned tofu for Scramble

With a little oil and kosher salt in a non-stick skillet, sauté the onion and bell pepper on medium-high heat until softened but still colorful (about 3 minutes). Then add the marinated tofu, stir and toss to heat, combine, and brown. This will be take about 5-6 minutes, adjust your heat as needed but it should be consistent around medium heat.

This will make about 3 servings and is great in breakfast burritos and sandwiches, or just alone with some nice toast and coffee!

Enjoy!

Basic Tomato Sauce

Prep time: 15 minutes /Cook time: 90 minutes/Total Time: 2 hours

One of the reasons I started this blog was for my kids. As daring, industrious young adults (mostly vegan and nearly vegan), they wanted a lot of my recipes of the food they grew up on to cook for themselves. They always loved my tomato sauce and I’ve always given them a quick, “Oh, it’s easy, take this and this and cook it together for a while.” When visiting me though, they claimed that it never quite tasted the same, so we cooked this Basic Tomato Sauce together. What I discovered is that “basic” is a qualifier for the sauce, not the skills and timing needed to produce a hearty and rich tomato sauce.

My kids were pretty much looking at the list, dumping the ingredients in a pot, and simmering it for about 30 minutes. While I’m a big believer in “If you use good ingredients, you’ll get a good product,” any recipe is a little more than simply the sum of its parts – I needed to refine my kid’s technique a little bit. See the notes below for hints!

2 28 oz cans of tomato sauce or crushed tomatoes (see notes below)

1 28 oz can of tomato puree

¼ cup of high-heat and olive oil mix

1 medium to large yellow onion, chopped

4-6 cloves of garlic, chopped or crushed, large pieces

1 ½ cups red wine (or white wine or beer – see notes)

1 ½ Tbs of Italian Seasoning (mixed herbs only, no salt),

OR

(1 tsp dried oregano

1 tsp dried thyme

1 tsp dried parsley

1 tsp dried tarragon

1 tsp dried basil)

2 Tbs Kosher salt

1 tsp dried rosemary, crushed

1 tsp garlic powder

1 Tbs fennel seed

1 Tbs Crushed Red Pepper Flakes

4 Tbs Balsamic Vinegar – split

Handful of chopped fresh basil, oregano, and parsley (optional)

2 Tbs Extra Virgin Olive Oil

Start with a hot pot. Preheat a 5-7 quart Dutch oven or other large heavy-bottomed pot on the stovetop. Add the high-heat oil and olive oil mix and then add the garlic and onions and sauté on medium heat until they get translucent. Toward the end of the sauté time, add all the herbs and 2 Tbs of the balsamic vinegar, cook with the o & g the last couple minutes.

When the onions, garlic, and herbs are soft, boost the heat and stir. As soon as it’s starting to get nice and hot, hit it with the wine and then lower the heat back down to medium and stir from the bottom to release any caramelization from the pan. This is when I open my cans…so let this simmer down for a couple minutes.

Add the tomato sauces first and stir until mixed. Then turn up the heat to medium high to get this simmering again. Once combined, stir in the puree, keep the heat on medium high and stir and bring back up to a simmer. This is when I usually add a little wine to each of the empty cans and swirl them around a bit, pour that into the pot too.

Adjust the heat and bring the sauce up to a slow bubbly simmer while stirring occasionally. At this point, everything should be smoothly combined, nothing stuck on the sides or bottom of the pot…kinda scrape the sides down and tuck it in by partially covering the pot.

Simmer slowly, stirring occasionally, for at least 1 hour.

Turn off heat.

Stir in the rest of the balsamic and 2 Tbs of olive oil and the optional chopped fresh herbs. Cover completely and let rest for about 20 minutes. Taste and adjust before serving.

Makes about  10 cups (2 batches)

Recipe notes:

Tomato Sauces – I use mid-quality/priced tomato sauces for this recipe, you can go more expensive, but I wouldn’t go cheaper. You can also adjust the texture of this sauce by substituting your tomato mix, smooth v chunky tomato sauce, the crushed tomatoes option will make the final product a little thinner and lighter, etc.

Wine – Be flexible, generally, I like a cheap Italian red wine for this, but something drinkable. If I’m making a lighter sauce I’ll use white wine, if I’m making something like ‘beef’-a-roni, I’ll even use a beer. If you want to eliminate the alcohol altogether, double the vinegar. You still want that acid.

Good luck and enjoy!

Yes Karen, bread is vegan

I’m not the best baker. I’m a little too “a dash of this and a dash of that” to go it on my own. So that’s why i was really excited to find this perfectly easy recipe for delicious crusty mini-loaves! With only four ingredients and minimal fuss, impress your family and friends with a warm homemade loaf and a kitchen that smells like fresh bread and love

Oatmeal Two Ways

Can I share a secret? It was only about 5 years ago that I realized that oats looked like an actual grain and not a little feathery disk that came out of an envelope with freeze-dried apples and tons of sugar. Now that that’s out in the open, I admit that I have never been much of a fan of a “sweet breakfast.” But when I started eating vegan over 4 years ago I wanted to start re-exploring whole grains and so oats were a natural fit. When you start making homemade oatmeal you quickly discover that it doesn’t have to be overly sweet and that it doesn’t just need to be some gloppy pasty bowl of mush, but rather a dish you can design to be sweet, nutty, crunchy, and even savory. It doesn’t have to be hard to prep either, here are a couple recipes (pretty standard stuff) that you can start the night before to make your hectic mornings easier…and nothing is more satisfying than a warm bowl of customized goodness!

Overnight Oats

1 part rolled oats

1 part almond milk

Mix ingredients and stir. Separate into single portions and chill overnight. Will last about a week in the fridge with fresh almond milk

Choose your own adventure: sweetners and add-ins … dates, raisins, nuts, seeds

Makes about 4 servings

Steel Cut Oats – Overnight Style

Bring four cups water to a boil. When the water comes to a boil, add 1 cup of steel cut oats and simmer for about 3 minutes, stir occasionally.

With about one minute left, add a pinch of salt. I like to add about a ½ cup of raisins here too.

Cover, remove from heat and let cool. Then refrigerate overnight.

The next morning take the pot out of the fridge and simmer to re-warm on med-hi heat for about 15 minutes.

Add Tasty Things!

Makes 4 hearty servings